Cara mudah Memindah Wordpress dari Godaddy ke VPS

Pada pembahasan kali ini, penulis akan jelaskan cara memindahkan blog wordpress dari godaddy ke hosting vps. Dalam tulisan ini penulis tidak sertakan gambar screenshoot, namun akan di jelaskan langkah demi langkah secara detail dan sudah penulis coba dengan hasil 100% work.

Penulis asumsikan pembaca sudah memahami dasar-dasar dari wordpress seperti kompres file/folder, download file, create domains, backup/restore database dan lain-lain. Oke. mari kita mulai.

Langkah pertama adalah kita login ke akun godaddy kita. Kemudian masuk di file manager, cari folder domain yang akan dipindah. Masuk ke folder content dan kompres folder plugins, themes, upload kemudian download ke komputer anda. penulis misalkan nama folder hasil backup dari masing-masing folder adalah pluginsx,themesx dan uploadsx.

Langkah kedua masuk ke admin blog wordpress yang mau anda pindah, kemudian install plugin wp-db-backup by austin matzko. Kemudian ke tools, pilih backup dan pilih "download to your computer". Klik backup now. tunggu sampai progress backup selesai. Misal nama filenya adalah "database-backup01.sql"

Sampai tahap ini kita sudah mendapatkan file-file yang dibutuhkan untuk perpindahan blog wordpress. Mari kita menuju ke langkah selanjutnya.

Masuk ke domain registerar anda dan arahkan name server domain yang akan di pindah ke name server hosting yang baru.

Kemudian login ke hosting baru anda dan masukkan domain yang akan anda pindah. Entah itu anda letakkan di root atau di addons domain, terserah anda. Kemudian install wordpress domain yang baru anda masukkan barusan. Jangan lupa untuk mencatat DB name pada instalan tersebut. misal "wp640"

Setelah proses install wordpress selesai langkah selanjutnya adalah masuk ke phpmyadmin, pada kolom sebelah kiri cari DB name wp640. masuk ke DB tersebut, klik import, choose file dan upload file database-backup01.sql.

Langkah terahir masuk ke file manager, cari domain yang baru diinstall tadi dan upload folder plugins, themes, upload dari backupan tadi. Kemudian ekstrak dari kompresan sehingga langsung di replace pada folder sebelumnya.

Semoga membantu.

Program Management Bandwidth

Buat mas Kali Kerok. Ini tutorial pesanan anda. selamat mencoba.....

1. Buka aplikasi p2pover, maka biasanya pada saat pertama dijalankan, secara otomatis akan muncul kotak dialog peringatan yang menyuruh kita untuk mengatur "System Setting" terlebih dahulu dan memilih adapter jenis apa yang kita gunakan untuk terkoneksi ke internet. Untuk laptop biasanya ada 2 pilihan adapter, yaitu LAN dan Wireless LAN. Pilih adapter yang kita gunakan lalu klik "OK".

2. Pada barisan menu p2pover, klik "Settings -- Schedules Setting".

3. Pada kotak dialog "Schedules" Setting yang muncul klik tombol "New(N)"


4. Beri nama terserah anda pada "Schedule's Name", lalu klik kanan pada kolom di bawahnya dan pilih "Select All(A)". Kemudian klik "OK" dan tutup kotak dialog "Schedules Setting".


5. Tahap ini adalah tahap untuk mengatur besarnya bandwidth yang akan kita batasi pada kecepatan "Download" dan "Upload". Klik pada menu "Settings -- Rules Setting".


6.  Pada kotak dialog "Rules Setting" yang muncul klik tombol "New(N)".


7. Beri nama terserah anda pada "rule's name" dan pada kolom di bawahnya pilih "schedule" yang sudah kita buat sebelumnya lalu klik "Next>".

8. Tentukan besarnya batasan bandwidth untuk kecepatan "Incoming(Download)" dan "Outgoing(Upload)" lalu klik "Next>".
Note: Paling kecil adalah 10Kbps karena masih ada pilihan Drop untuk membunuh koneksi komputer target sepenuhnya.

9. Pada tahap "P2P" klik "Next>" saja atau centang sesuai keinginan.

10. Pada tahap "IM" juga klik "Next>" saja atau centang sesuai keinginan.

11. Pada tahap "HTTP/FTP Download" kita bisa mengosongkan dan langsung klik "Next>" atau mengisi sesuai keinginan extensi file yang akan kita blokir Downloadnya. Pada gambar saya contohkan saya memblokir file .avi dan .mkv.

12. Pada tahap "WWW" kita pilih "Restricted with rule" kemudian kita centang semua dan pilih "Blacklist" lalu klik "Next>".

13. Pada tahap "ACL Setting" kita kosongkan saja dan langsung klik "Finish" lalu tutup kotak dialog "Rules Setting".

14. Untuk membuat "Rules" dengan batas kecepatan bandwidth yang berbeda, ulangi langkah 5 sampai 13.
15. Kemudian kita lanjutkan pada tahap pencarian komputer yang aktif di jaringan dengan mengklik tombol "Scan" berlogo Kaca Pembesar. Tunggu hingga proses selesai.

16. Dapat kita lihat bahwa pada daftar komputer yang berada di urutan paling atas adalah komputer "LocalHost" atau komputer kita sendiri. Klik kanan pada daftar komputer lalu pilih "Control All".

17. Klik tombol "Start" berlogo Centang Hijau.

18. Klik kanan pada salah satu komputer yang ada di daftar dan pilih "Apply Rule to Hosts Selected".

19. Pilih besarnya Rules sesuai yang sudah kita buat sebelumnya lalu klik "OK". Maka komputer target sudah kita batasi kecepatan bandwidthnya.

20. Untuk membunuh atau memblokir koneksi komputer target sepenuhnya, klik kanan pada salah satu komputer yang ada di daftar dan pilih "Drop Hosts Selected".

Download Program Disini
Sumber : http://coolkadet.blogspot.com

Perhitungan Burst Pada Mikrotik

Berikut adalah cara perhitungan Burst Limit, Burst Threshold, Burst Time pada simple queue Mikrotik.


Lama waktu ideal untuk mengakses sebuah situs harusnya tidaklah lebih dari 10 hitungan jari atau 10 detik. Hal ini diperlukan untuk memberikan kenyamanan bagi user dalam melakukan aktivitas browsing. Maka tak ada salahnya kita memberikan aliran Bandwidth yang cukup besar pada 10 detik pertama, dan selanjutnya kita batasi untuk memberikan download file yang biasanya lebih dari 10 detik.

Burst pada simple Queue bertujuan untuk mengijinkan aliran data tertinggi untuk beberapa periode waktu. Fasilitas ini berguna untuk membatasi pemakaian bandwidth secara berlebihan dan terus menerus bagi user-user yang rakus akan bandwidth. Hanya pada beberapa periode waktu tertentu sajalah user mendapatkan jatah b/w yang cukup besar.

Pada fitur Burst terdapat beberapa variabel yang harus ditentukan nilainya, antara lain Burst Limit, Burst Threshold dan Burst Time. Yang perlu diperhatikan adalah, jika rata-rata aliran data lebih rendah dari “Burst Threshold“, Burst akan secara aktual mengikuti “Burst Limit", dimana setiap detik router akan menghitung rata-rata data yang dicapai melalui burst time yang terakhir.

Penulis menggunakan rumus tersendiri yang di buat di excel

Dimana :

N = Interval time

X = Burst Limit

Y = Burst Threshold

Z = Burst Time

M = Max Limit

Rumus : Y = (X*N) / Z

M = 4/3 * Y

Contoh :

X = 1024 kbps

N = 10 detik

Z = 40 s

Y = (1024*10) / 40 = 256 kbps

Maka di dapat Burst Threshold = 256 kbps

M = 4/3 * 256 = 342 kbps

Maka di dapat Max Limit = 342kbps

Jika di set maka hasil yang di dapat :

Dari grafik di atas di liat waktu buka website bandwidth langsung naik dari 256 kbps ke 1024 kbps trus makin lama makin turun ke max limit 342 kbps. Teknis ini dapat menghemat bandwidth agar tidak banyak user mengambil bandwidth untuk download.

Untuk limit at dapat di hitung dengan cara misalkan ada 6 komputer. Bandwidth yang kita punya max 1 Mbps (1024 kbps) maka bagi 6 (1024/6) = 170 kbps kita set limit at tidak boleh lebih dari 170 kbps atau kasih rata-rata = 128 kbps. Sehingga user minimal dapat bandwidth 128 kbps.

Sumber : http://mikrotikindo.blogspot.com

Diagnose video card problems by comparing with example corrupted screens

Video card artifacts examples

Drawing errors made by video cards are refered to as visual artifacts. These artifacts can be caused both by software and hardware problems. If you see artifacts during the power-up screens before your operating system loads then you know it has nothing to do with drivers. There are any loaded yet. If you're seeing visual artifacts in just one program then it may be a software problem with that program. But if you have artifacts in many programs then you may have a driver problem or bad hardware. If you're seeing artifacts only after the operating system loads then the first thing you should do is the standard "update your drivers" drill: update your motherboard chipset drivers, and uninstall your display drivers and then reinstall the latest display drivers. Updating your drivers can sometimes fix your problems and you should always do this even if you think that your hardware is responsible. You should exhaust the easy software solutions before guessing that you have bad hardware.

It's also a good idea to open up your computer and make sure all the fans are working. Overheating is a common cause of artifacts so you should check that any fan on your video card is rotating. The temperature of your video card depends on what kind of program you are running. Most video cards are relatively cool when you are running 2D programs. The temperature of the video card increases when running 3D programs like games. If your artifacts only show up after a few minutes of playing games then overheating is usually the cause. The silicon chips on your video card run slower at higher temperatures. The hotter the chips get the more trouble they have keeping up at their standard clock rates. You can prove that it's an overheating problem by running your computer with the case open and aiming a desk fan at the video card. If the artifacts go away then you know that you have an overheating problem.

Another thing you can try to reduce artifacts is to underclock your video card. Underclocking reduces the clock rates of your GPU or video RAM. Reducing clock rates lowers the temperature of the chips and often allows weak ones to work properly. There are instructions on how to underclock your video card on this page. And if you're overclocking your video card then you should back off on your overclock. Overclocking often causes artifacts. Excessive overclocks can raise the temperature enough to cause cumulative damage. The overclock may work properly at first and then artifacts only start showing up weeks or months later after the chips have been sufficiently damaged.

A lot of hardware must be functioning properly to generate images correctly but there are three main sources of problems: the video RAM on your video card, the GPU which is the main chip on the video card which does the drawing, and the bus interface which transfers data between your video card and your motherboard. You can often get an idea of which is causing the problem by looking carefully at the artifacts.

If your artifacts are covering the entire screen and involve color shifts or slight position shifts, then the problem may be caused by your monitor. If you have another monitor available then you should try it out to see if that's the problem. If you don't have another monitor then you can take screenshots of the screen. To do that press the Print Screen key and then go into an image editing program (like Windows Paint) and paste the clipboard to an image. You can also use free programs like Fraps to write screenshots directly to a file. If the screenshot looks fine on another computer but the screen looked bad on your monitor then the problem could either be a problem with your monitor or with the video output circuitry of your video card. Most of the time it's the monitor rather than the video output circuitry.

Video RAM artifacts

The video RAM on your video card keeps track of many different kinds of data. If your video RAM is failing then it causes some common kinds of artifacts depending on what kind of data is stored in the bad RAM. When RAM goes bad, quite often just a small fraction of the RAM chip fails while most of it continues to work properly. That can result in images which are largely correct but still have some small flaws.


The video RAM holds areas called frame buffers. They are used by the video card to store copies of the final screen image or intermediate versions of the screen image which are still being drawn. If the frame buffer is stored in bad video RAM then you often get artifacts which appear as color shifts in parts of the image. The image above shows lots of little bars. The screen is still visible but there are substantial color shifts within the little bars. This is the most common symptom of bad video RAM.


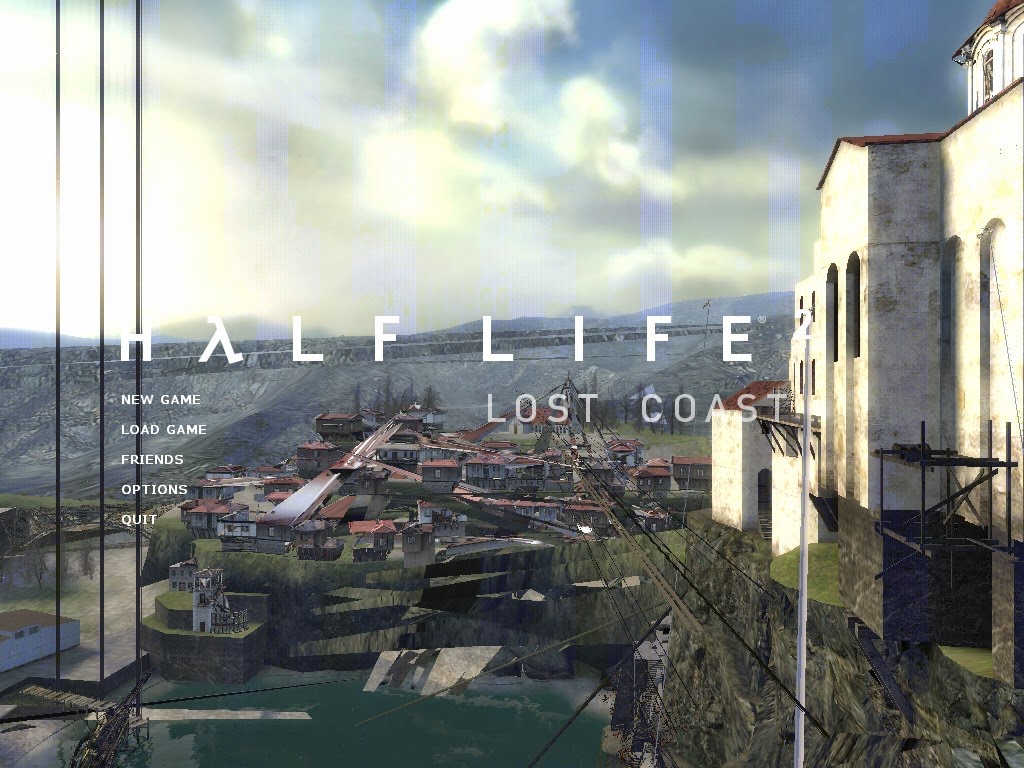
The image above has some yellow shifted areas which are most clearly visible in the sky. You can still see the sky image but it just appears more yellow than it should be. Images are made on a computer by adding the red, green, and blue component parts of an image together to make the final color. Those areas in the sky are shifted yellow because the bad video RAM in this case holds the blue component and too little blue results in a shift to yellow. You can see other kinds of color shifts depending on which parts of the video RAM are not working. The color shifts can be subtle or obvious depending on which parts of the video RAM have died. This kind of artifact can appear for both 2D mode or 3D mode graphics.

Another kind of video RAM artifact is an unexpected spike. When drawing in 3D mode, video RAM can be used to hold the three dimensional position of things in the scene. Bad RAM can shift those positions to a different spot. A spike is the result when one 3D position has moved while the others around it have stayed in their correct positions. It looks like someone has grabbed one tiny spot on some object in the scene and pulled it to another position thereby creating a long skinny spike. You can see some spikes in the image above like the ones which end near the word "lost".


Arrays of dots or vertical and horizontal lines are another common video RAM artifact. In the image above you can see a few areas of dots on the doors. Most examples have more dots than in this image. This kind of problem can appear both in 2D and 3D mode.

So what do you do if you think you have bad video RAM? Unfortunately, there's no well supported video RAM testing program that I'm aware of (there are a few old obscure ones that I don't trust) so it's not easy to test directly. One thing you should do is test your motherboard RAM. Video cards often store data in the motherboard RAM so sometimes it can cause artifacts which look like video RAM problems. It's easy to test your motherboard RAM so you should always do that before assuming that the video card's RAM is at fault. Overheating can definitely cause video RAM problems so you should try running your computer with the desk fan blowing on the video card as described above.

If you're overclocking your video card then the first thing you should do is back off on your overclock. Increasing your video RAM clock commonly causes artifacts. It can overheat your RAM enough to permanently damage it. The damage is cumulative and RAM seems especially vulnerable to it. I've seen plently of examples of people whose overclocks worked for a few months and then they started getting RAM artifacts. They discover that they have to reduce the RAM clock rate to make the artifacts go away. And then later they have to reduce their RAM clock more and more as their RAM deteriorates. They often end up running at clock rate far below stock to stop the artifacts. Overclocking is risky and increased heat accelerates the rate at which the RAM gets worse. Even if you're not overclocking then you can try underclocking your video RAM to see if the problem goes away. There are instructions on how to underclock on this page. If underclocking makes the artifacts go away then you know you have a hardware problem.

Unfortunately, there's not much you can do about bad video RAM. It's soldered to the video card and the video card manufacturers normally replace the whole card rather than try to rework individual chips. Sometimes you can make the symptoms go away by having an extra fan inside the computer blowing air past the video card. If it's an overheating problem then you can occasionally improve your situation by epoxying RAM heatsinks to the RAM chips but usually heatsinks don't help. Sometimes underclocking can help. But most of the time bad video RAM is permanently damaged and you just have to replace the video card.

GPU artifacts


GPU stands for graphics processing unit. It's the main chip on your video card which does the actual drawing. GPU artifacts can look like just about anything and can get sufficiently severe that nothing on the screen is recognizable. A common form of serious GPU artifact is a checkerboard pattern which covers the entire screen. GPU artifacts are usually heat related and can often be solved by reducing the GPU temperature. If your video card has a fan then its main job is to cool your GPU. You should check to make sure that it's spinning. You can also try running the computer with the case open and aiming a desk fan at the video card. Sometimes the artifacts are caused by a GPU chip which has been overclocked too much or just can't run at stock speed. Underclocking the GPU often solves the problem without having to reduce the clock rate of the GPU too much. If underclocking fixes the problem but you don't want to reduce the GPU speed then you can try an after-market video card cooler. They are available for most popular video cards and are often much more effective coolers than the ones which come with the video card.

Bus artifacts


Video cards sometimes place some of their data in RAM on the motherboard. They load the data from the motherboard into the video card when needed. AGP motherboards occasionally corrupt the data when it's transferred into the video card. The artifacts can often look like very bad video RAM artifacts. In the case shown above the problem was solved by reducing the AGP speed multiplier from 8x to 4x. There are instructions on how to reduce your AGP multiplier on this page. PCI and PCI-Express video cards rarely have this problem.

Tinted screen

There's no point in showing screenshots on this one. A tinted screen is a screen which appears correct except the color of the entire screen appears wrong. The whole screen may be too red, too yellow, or tinted just about any color. The most common cause of a tinted screen is a misadjusted or damaged monitor. It can also be caused by problems with the monitor cable, the video card connector, or the monitor connector. On rare occasions it can be caused by a problem with the video card chip which outputs the video signal.

If you have another monitor then connect it to the computer to see if the tint goes away. If you see the same tint then the monitor and cable aren't at fault. In most cases, swapping monitors eliminates the tint. If swapping monitors doesn't fix it then you may have a problem in the output circuitry of your video card or a mechanical problem with the video card's output connector. If the tint seems to be caused by the monitor then the first thing to do is try to adjust the monitor color controls to eliminate the tint. Most monitors have a reset command which resets the controls to default. Use that to make sure that the monitor isn't just misadjusted. If you have a CRT monitor then run the degauss command to make sure magnetization isn't causing any color problems. Display an image with red, green, and blue areas and see if you can make the tint disappear by fiddling with the controls. If not then turn the computer off and unplug and replug the monitor cable at the video card end and the monitor end if it has a connector. Sometimes there are bad contacts in the connectors and unplugging and replugging the cable will fix it. If your monitor has a removable cable and you have another one lying around then try swapping cables.

If nothing makes the tint go away then you usually just have a bad monitor but the only way to be sure is to try in on another computer. It can occasionally be the video card so you really need to swap parts to be sure.

DVI corruption


If you're using a digital DVI connection between your video card and monitor then you can get DVI corruption problems which usually appear as wobbly vertical lines. The left part of the image above is displayed correctly. The right part is showing DVI corruption. The severity of the corruption varies. You can see other example screenshots of DVI corruption here and here. This page goes into detail on how to deal with DVI corruption.

Sumber : www.playtool.com/pages/artifacts/artifacts.html

Baterai Laptop : Dipasang atau Dilepas ?

Di balik kenyamanannya, laptop menyimpan masalah lawas bagi pengguna, yaitu baterai. Akhirnya, banyak yang menggunakan laptop sambil mengisi ulang baterai melalui listrik agar tetap bisa beraktivitas.

Akan tetapi, tidak sedikit pula yang memilih untuk mencopotnya dan langsung menghubungkan laptop ke sumber listrik. Menurut Teknisi Komputer dari Great Power Computer, Casei Bakrie, kedua cara tersebut sebenarnya memiliki risiko terhadap kinerja perangkat elektronik itu. Apabila memutuskan tetap memasang baterai, dalam jangka panjang baterai laptop bisa kembung dan kinerjanya mulai menurun.

"Kalau daya baterai sudah penuh seratus persen tapi masih terus di-charge, nantinya baterai akan mudah panas dan cepat drop," ujar Casei saat diwawancarai Plasadana.com untuk Yahoo Indonesia.

Sedangkan jika mencabut baterai ketika mengoperasikan laptop, risikonya justru jauh lebih besar. Sebab, listrik akan langsung menuju hardware tanpa adanya penyesuaian tenaga, sehingga komponen laptop menerima tegangan yang berlebihan.

"Apalagi kalau tiba-tiba ada pemadaman listrik. Efeknya bisa merusak mother board, hard disk, IC Power, dan beberapa komponen lain," papar dia.

Untuk meminimalisir risiko, dia menyarankan, sebaiknya baterai tetap terpasang ketika laptop dioperasikan. Namun, saat indikator power sudah menunjukan angka 99 persen sebaiknya segera cabut adaptor laptop.

Sebaliknya, apabila indikator sudah mendekati 20-10 persen, segera pasang kembali adaptornya. Sebab, kalau laptop dibiarkan mati total karena kehabisan tenaga, juga berbahaya bagi kondisi baterai.

"Biasanya akan muncul peringatan kalau tenaga baterai sudah berada di bawah 10 persen. Tapi kalau mau lebih aman, bisa pasang alarm untuk mengingatkan. Software untuk peringatan kondisi baterai banyak kok di internet," terang dia.

Namun demikian, sambung Casei, ada beberapa vendor yang sudah mengantisipasi masalah tersebut. Misal, untuk beberapa produk Lenovo biasanya sudah diatur supaya tidak bisa mengisi daya sampai 100 persen dan hanya berhenti di 99 persen.

Sedangkan untuk produk buatan Asus dan Acer, umumnya menggunakan teknologi auto switch power. Dengan begitu, arus listrik akan otomatis terputus jika tenaga yang masuk sudah mencapai batas maksimal.

"Buat laptop keluaran tahun 2013 ke atas biasanya sudah menggunakan teknologi ini, termasuk laptop yang yang memakai baterai jenis polymer,” ungkap dia.

Lebih lanjut Casei menerangkan, untuk mengetahui apakah baterai sudah mengalami kerusakan dan penurunan kinerja, dapat dilihat dari indikator power yang terletak di pojok kanan bawah layar laptop. Jika terdapat tanda silang merah ketika laptop sedang di-charge meski baterai masih terpasang, maka itu adalah gejala kerusakan baterai.

"Kalau ada tanda silang tapi baterai masih kuat bekerja selama 3-4 jam tanpa perlu diisi ulang, maka baterai masih bisa diperbaiki. Tapi, bila baterai hanya bertahan 30-40 menit tanpa tenaga tambahan, artinya kinerja baterai sudah menurun dan perlu diganti," ujarnya.

Sumber : id.berita.yahoo.com/amankan-baterai-laptop-anda-030600108.html

Memperbaiki VGA Card Yang Rusak atau Mati Dengan Cara Sederhana

Berikut ada beberapa tips yang bisa dicoba untuk memperbaiki VGA rusak. Kalau kita memiliki VGA yang mati atau timbul artifact, jgn buru-buru diganti atau dibuang dulu. Berikut ada tips buat memperbaiki vga rusak yang mati atau timbul artifact.

Langkahnya 1. sebagai berikut :

  • Lepas Vga card pada slot motherboard.
  • Kemudian lepaskan kipas n Heat zink
  • Bersihkan dengan kuas kecil secara perlahan pada semua bagian
  • Perhatikan pasta yang menempel pada chip, jika sudah mengering bersihkan dan beri pasta yang baru. Pemberian pasta yang baru pada chip dapat membantu menormalkan sistem pendingin vga sehingga vga kembali normal
  • Jika sudah selesai pasang kembali kipas dan n heat zing pada vga dan pasang VGA tersebut di motherboard
  • Selanjutnya silahkan tes, nyalakan PC dan lihat apakah vga sudah kembali normal atau belum. Jika belum jangan putus asa dulu, masih ada cara yang kedua

Langkah 2. sebagai berikut  :

Persiapkan dulu alat-alatnya
  • Vga yang mati atau timbul artifact
  • Kuas kecil/sikat gigi bekas
  • Alumunium foil
  • Alas panggang oven
  • Thermal pasta
  • Obeng(untuk melepas HSF)
Caranya:
  1. Lepas Vga pada slot motherboard, lepaskan kipas dan Heat Zink vga.
  2. Rendam vga kedalam air yang sudah dicampur dengan sabun (bisa dengan rinso, soklin, sunlight, dsb) sambil dibersihkan menggunakan kuas/sikat gigi.
  3. Jika sudah bersih,keringkan sampai benar-benar kering dengan hair dryer/kipas angin
  4. Panggang vga tersebut kedalam oven, sebelum dipanggang vga harus diberi alas yaitu alumunium foil. Panggang dengan suhu berkisar antara 40-50c, jangan terlalu panas! kalau kepanasan bisa meleleh vga,   5-10 menit sudah cukup, jangan lebih biar tidak angus terbakar
  5. Setelah selesai keluarkan vga tersebut dari oven dan biarkan hingga panasnya hilang
  6. Beri thermal pasta yang baru pada chips-nya, kemudian pasang kembali kipas n Heat Zin-nya
  7. Pasang kembali vga pada motherbord, nyalakan PC dan lihat hasilnya.
Untuk point 4 tidak harus menggunakan oven jika tidak punya, bisa juga dengan uap panas dari api atau dijemur di terik metahari kira-kira 60 menit. tapi pastikan dulu kondisi cuacanya, kalau sudah dites tapi masih tetep mati/artifact berarti solusinya di lem biru (ganti baru, hehehe...), tapi kalau kembali normal berarti anda beruntung.  cara ini bisa juga dipraktekan pada motherboard yang mati total. Tapi ingat cara ini hanya berlaku untuk Vga yang mati atau timbul artifak. sebelum dipraktekin anggap saja itu Vga sudah benar-benar rusak. kemungkinan berhasil 50:50.

Kegunaanya air sabun(rinso/sunlight)
  • Menghilangkan Kotoran yang bersifat konduktif
Kotoran, baik debu atau kelembaban dapat saja menumpuk setelah sekian lama motherboard beroperasi. Debu atau kelembaban tersebut pada suatu titik tertentu akan menjadi konduktif, dan akan menghubung-singkatkan komponen-komponen kritikal seperti chipset dan prosesor. Kalaupun komponen-komponen tersebut tidak terhubung singkat karena debu atau kelembaban, listrik statik yang mungkin timbul dari kotoran sudah cukup untuk merusak komponen motherboard.
  • Air dapat me-reset IC dengan menguhung-singkatkan kaki-kaki (pin) nya.
Chip silikon seperti IC CMOS dan prosesor memang terkenal sangat sensitif. Sedikit saja mendapat perlakuan tidak wajar, chip tersebut akan berhenti bekerja. Bisa saja air dapat menormalkan kerja chip dengan menghubung singkatkan pin-pin yang kritikal (Efek RESET). Begitu juga dengan komponen dasar yang sudah jenuh seperti kapasitor (elco) dapat mengosongkan muatannya dengan menghubung-singkatkan kedua kakinya.
  • Permukaan motherboard bebas dari kotoran dan minyak.

Sumber : ismaya-sari.blogspot.com

Cara Membuat Otomatis Disable dan Enable Transparent Proxy ke External Proxy di Mikrotik


Misalnya proxy bermasalah atau lampu mati,biasanya kita disable TRANSPARENT PROXY redirect ke external proxy tersebut supaya internet tetap terkoneksi,dan ada juga kasus misalnya setelah lampu nyala tetapi proxy lagi reload lama banget,skitar 5 sampai 15 menit..tentu saja TRANSPARENT PROXY tadi di enable setelah proxy reload selama 5 sampai 15 menit,yah terpaksa menunggu waktu 5 sampai 15 menit untuk enablekan TRANSPARENT PROXY tersebut,kasus tersebut bisa saya pecahkan dengan otomatis enable disable TRANSPARENT PROXY dan berdasarkan waktu enable disable otomatisnya juga,misalnya proxy error atau mati lampu,otomatis TRANSPARENT PROXY disable dan otomatis enable nya setelah 15 menit,berikut caranya:

Sebelumnya setting mikrotik anda supaya jam dan waktu dan tahunnya nya tidak kembali ke tahun 1970 jika mikrotik mati.

Remote Mikrotik anda dengan winbox kemudian pilih Ip kemudian Firewall kemudian Nat,perhatikan urutan TRANSPARENT PROXY tersebut,di nomor berapakah dia,kalau saya nomor 1,dan di ingat posisinya.

kemudian pilih tool kemudian netwatch.

Kemudian klik tanda + dan isi :
Host = 192.168.254.2 (ini adalah ip proxy,silahkan sesuaikan dengan ip proxy anda)
Interval = 00:00:01 (tidak ada perubahan untuk ini)
Time Out = 20 Ms (tidak ada perubahan disini)
Down = ip firewall nat disable 1 (nomor 1 adalah urutan TRANSPARENT PROXY jika urutan TRANSPARENT PROXY anda nomor 2 berarti Down= ip firewall nat disable 2) silahkan sesuaikan.
Kemudian klik OK:

Kemudian klik lagi tanda + dan isi :
Host = 192.168.254.2 (ini adalah ip proxy,silahkan sesuaikan dengan ip proxy anda)
Interval = 00:00:01 (tidak ada perubahan untuk ini)
Time Out = 1000000 Ms (1000000 ms adalah 16 menit 40 detik,berarti akan enable setelah 16 menit 40 detik,berapa lamakah proxy anda aktifnya?,silahkan sesuaikan ms nya)
Up = ip firewall nat enable 1 (nomor 1 adalah urutan TRANSPARENT PROXY jika urutan TRANSPARENT PROXY anda nomor 2 berarti Up= ip firewall nat enable 2) silahkan sesuaikan.
Kemudian klik OK:

Untuk test silahkan cabut LAN proxy nya kemudian lihat ip kemudian firewall kemudian Nat di winboxnya..apakah disable sendiri TRANSPARENT PROXY nya?jika iya berarti langkah udah benar,kemudian colokkan lagi LAN proxy nya apakah 16 menit kemudian Enable sendiri TRANSPARENT PROXY nya?jika iya berarti langkah sudah benar,selamat mencoba.

Sumber : wirelessrouterproxy.com

Cara Install Lusca FMI


Remote Ubuntu server kita Dengan PuTTY dari PC admin

Login ke root cek Ping ke public utuk internet proxy-nya jika sudah jalan mari kita lanjutkan,..

Update & upgrade repositor Ubuntu
Copas kode dibawah ini dan pastekan di terminal PuTTY ( klik kanan lalu Enter )
apt-get update && apt-get upgrade -y && apt-get dist-upgrade -y && apt-get install squid -y && apt-get install squid squidclient squid-cgi -y && apt-get install gcc -y && apt-get install build-essential -y && apt-get install sharutils -y && apt-get install ccze -y && apt-get install libzip-dev -y && apt-get install automake1.9 -y && wget http://proxy-ku.googlecode.com/files/LUSCA_FMI.tar.gz && tar xzvf LUSCA_FMI.tar.gz && cd LUSCA_FMI/ && make distclean
Tunggu sampai selesai, lama waktu update tergantung koneksi internet kita!!

Lakukan perintah compile Untuk Lusca FMI
Copas Kodennya:
./configure --prefix=/usr --exec_prefix=/usr --bindir=/usr/sbin --sbindir=/usr/sbin --libexecdir=/usr/lib/squid --sysconfdir=/etc/squid --localstatedir=/var/spool/squid --datadir=/usr/share/squid --enable-http-gzip --enable-async-io=24 --with-aufs-threads=24 --with-pthreads --enable-storeio=aufs --enable-linux-netfilter --enable-arp-acl --enable-epoll --enable-removal-policies=heap --with-aio --with-dl --enable-snmp --enable-delay-pools --enable-htcp --enable-cache-digests --disable-unlinkd --enable-large-cache-files --with-large-files --enable-err-languages=English --enable-default-err-language=English --with-maxfd=65536 && make && make install

Setelah proses selesai lanjutkan pada proses berikut
Copy file-file berikut dengan Program WinSCP
- File "squid.conf" yang telah disesuaikan ke folder: /etc/squid/
- File "storeurl.pl" ke folder: /etc/squid/
- File "squid" ke folder: /etc/init.d/
Setelah selesai di copy mari kita lanjutkan langkah berikutnya :

Memberikan izin akses kepada user squid
Copas Kodennya:
chmod +x /etc/init.d/squid && /etc/init.d/squid stop

Memberikan permission pada folder cache
Copas Kodennya:
chown proxy:proxy /cache && chmod 777 /cache chown proxy:proxy /etc/squid/storeurl.pl && chmod 777 /etc/squid/storeurl.pl && chmod +x /etc/init.d/squid

Membuat folder swap/cache di dalam folder cache
/etc/init.d/squid stop
squid -f /etc/squid/squid.conf -z && /etc/init.d/squid restart

Agar proses shutdown dapat langsung dijalankan dengan menekan tombol Power gunakan perintah berikut:
apt-get install acpid

------- reboot -------

 
Diberdayakan oleh Blogger.